
Mullvad is a fairly popular and generally trustworthy VPN provider. In this post, I will walk you through how to use the official Mullvad client in a ProxyVM on Qubes OS. This method is a lot more convenient than the official guide from Mullvad (which recommends that you manually load in OpenVPN or Wireguard profiles) and will let you seamlessly switch between different location and network setups just as you would on a normal Linux installation.
Preparing your TemplateVM
I recommend that you make a new TemplateVM based on the latest Fedora GNOME template and remove all unnecessary packages that you might not use. This way, you can minimize the attack surface while not having to deal with missing dependencies like on a minimal template. With that being said, if you do manage to get the minimal template to fully work with Mullvad, feel free to open a discussion on GitHub or contact me directly and I will update the post accordingly.
I run this script on my template to trim it down.
Next, you need to create the bind directories for Mullvad’s configurations:
sudo mkdir -p /etc/qubes-bind-dirs.d
echo 'binds+=( '\'''/etc/mullvad-vpn''\'' )' | sudo tee /etc/qubes-bind-dirs.d/50_user.conf
Installing the Mullvad App
Inside of the TemplateVM you have just created, do the following:
sudo dnf config-manager addrepo --from-repofile=https://repository.mullvad.net/rpm/stable/mullvad.repo
sudo dnf install -y mullvad-vpn
To work around issue 3803, we will be using systemd path to run /usr/lib/qubes/qubes-setup-dnat-to-ns every time Mullvad modifies /etc/resolv.conf. Create the following files:
/etc/systemd/system/dnat-to-ns.service
[Unit]
Description=Run /usr/lib/qubes/qubes-setup-dnat-to-ns
StartLimitIntervalSec=0

[Service]
Type=oneshot
ExecStart=/usr/bin/systemctl restart systemd-resolved
ExecStart=/usr/lib/qubes/qubes-setup-dnat-to-ns
/etc/systemd/system/dnat-to-ns.path
[Unit]
Description=Run /usr/lib/qubes/qubes-setup-dnat-to-ns when /etc/resolv.conf changes

[Path]
PathChanged=/etc/resolv.conf
Unit=dnat-to-ns.service

[Install]
WantedBy=multi-user.target
Create /etc/systemd/system/systemd-resolved.conf.d/override.conf to disable rate limiting on systemd-resolved restarting:
[Unit]
StartLimitIntervalSec=0
Next, enable the systemd path:
sudo systemctl enable dnat-to-ns.path
Finally, shut down the TemplateVM:
sudo shutdown now
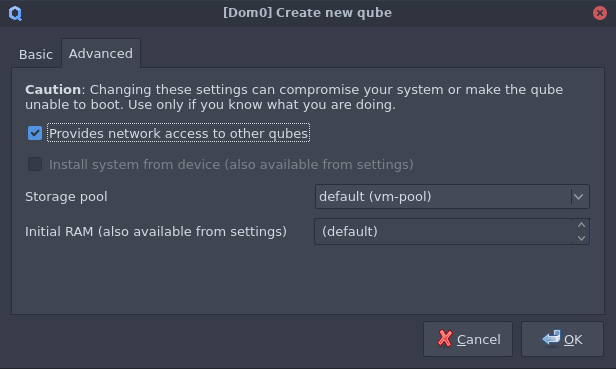
Creating the ProxyVM
Create an AppVM based on the TemplateVM you have just created. Set sys-firewall (or whatever FirewallVM you have connected to your sys-net) as the net qube. If you do not have such FirewallVM, use sys-net as the net qube. Next, go to the advanced tab and tick the provides network access to other qubes box.
Open the Mullvad VPN app. Go to Settings → VPN settings and toggle Local network sharing. Due to some strange interaction between qubes services and Mullvad VPN, certain apps will get internet connections while others do not if this toggle is not enabled. This toggle will not actually allow AppVMs connected to the ProxyVM to connect to the local network.
Enable Lockdown mode to ensure that the killswitch stays on even when the tunnel is disconnected.
Additional Assurances
For additional assurances against VPN leaks, you can optionally add these 2 lines to /rw/config/qubes-firewall-user-script:
nft add rule qubes custom-forward oifname eth0 counter drop
nft add rule ip6 qubes custom-forward oifname eth0 counter drop
This is not strictly necessary, as I have not observed any leaks with the VPN killswitch provided by the app.
Notes
With this current setup, the ProxyVM you have just created will be responsible for handling Firewall rules for the qubes behind it. This is not ideal, as this is still a fairly large VM, and there is a risk that Mullvad or some other apps may interfere with its firewall handling.
Instead, I highly recommend that you create a minimal Mirage FirewallVM and use it as a firewall behind the Mullvad ProxyVM. Other AppVMs then should use the Mirage Firewall as the net qube instead. This way, you can make sure that firewall rules are properly enforced.